Tag: Brittany

Get started with long exposure 

Estimated Reading Time: 4 minutes

Long exposure photos can be some of the most remarkable images. But how do you get started with long exposure photography? Let me tell about a recent trip I did to Brittany, France, and give you some simple tips to get started.

I was lucky to be able to visit Tregastel, France during the 49th 24 hour sailing regatta (see the town’s French website – opens in a new tab).  This event hadn’t been held since 2019 due to the COVID pandemic. 

As the event takes place over 24 hours there was an ideal opportunity to experiment taking pictures of sailing yachts at night.  Additionally, there was a firework display scheduled that evening. A real treat.   Also a chance to try some other techniques.

What Is Long Exposure Photography? 

Exposure defines the duration that the camera’s sensor is exposed to light.  Originally it was the film, now it is the image sensor.  A short exposure lets in a little light, useful when in bright sunlight, and has the advantage of freezing movement as the subject is only seen for a fraction of a second by the sensor.  Long exposure photography does the opposite and uses a slow shutter speed keeping the sensor exposed to light for a longer period.  A long exposure will be defined when we keep the shutter open for a second or longer.  

Cameras will calculate the exposure time for you in automatic mode and you will see the time increase as light fades.  Many camaeras have a maximum of 30 seconds. In manual, or semi-automatic, mode you can set the time yourself.  Finally you can use Bulb mode, where you control the shutter, and it remains open as long as you are pressing the shutter release button.  

What does a long exposure create? 

As mentioned above long exposures will capture motion as the camera’s sensor is exposed to light for a longer period and  therefore a moving object will be seen by several parts of the sensor.  A common subject of long exposure landscape photos are rivers and waterfalls. As each drop of water travels across the sensor the water blurs and creates lines of blurred water, almost like clouds.  (You can see a long exposure waterfall image on the waterfall blog post) Images of waves at sea do the same thing.  Blurring will occur in any part of the scene where there’s motion.  This softens the image. 

In my case, even if I was by the sea, my target was to capture something moving in the dark.  In this case the long exposure lets what little light there is to be captured by the sensor.  This is how you can capture stars.  Of course, anything that is moving will  create the same soft blurred lines that a drop of falling water does. Whether it a boat or a star. So how do you get started with long exposure?

Tips for long exposure photography 

Taking photographs with a long exposure time is perfect for capturing motion blur and light trails. But there are some simple rules that must be followed.  Above I talked about moving subjects, but unfortunately the same is true if the camera moves.  If you shake the camera the tiniest amount when you press the shutter release button everything in the image will have that blurred movement effect and that is rarely the desired effect. 

Long exposure rules: 

  1. Use a tripod. Helps avoid camera shake. 
  1. Use a remote release button. This could be a wire, and remote control or a phone app. 
  1. Try various camera setting. There are broad rules, but you really need to set the camera up for your specific environment.  

Typical long exposure settings 

  1. The 500 rule. For star photography the 500 rule estimates the maximum exposure time you can shoot before stars become blurry or star trails appear. You divide 500 by the focal length of your lens. To capture the sky you would use a wide angle lens, for example,  a 18mm lens, then the rule says 500 / 18 = 27.78 seconds. This is just under the 30 second maximum that most cameras allow for a long exposure before going to bulb mode. 
  2. For fireworks. Fireworks are generally very bright so easy to see, but moving quickly and appear unpredictably. So start with ISO 200, F/11 and bulb. Press the shutter  release button when you hear the firework launch and keep it open until the firework fades. Check and see if you need to modify anything or everything.
  3. Use manual focus. It’s not easy for a camera to automatically focus on a firework which hasn’t even been lit yet. So set the focus to manual. We know the firework will be in the sky so set focus to infinity. In reality it’s not easy for us to do this either. Pointing the camera into the night sky and trying to focus when you can see nothing. A technique that can help is to set the camera to video mode and focus on some visible object, then switch to manual focus and finally back to camera mode. 

In my photographs you can see various fireworks which, ultimately, I took with F/7 to let a little more light in.  These simple tips should help you get started with long exposure photos.

If you are interested in other long exposure images take a look a the low light blog post.

Purchase my images.

You can purchase my images via the menu above or directly below:


Share my blog

You found this article interesting? I am thinking yes if you got this far. Please share with your friends
Walk around the Ile Grande

Estimated Reading Time: 2 minutes

If you have half a day for a walk and find yourself in Brittany, north-west of Lannion, there is a beautiful walk to do around the coast of the Ile Grande. And it’s a loop so you can start and finish at the same point. Where do you start? As it’s a loop you can start your walk around the Ile Grande almost anywhere. If you are in your car almost every time the road gets close to the coast you can park and join the coastal walk there.

A classic choice of starting point for your walk around the Ile Grande would be Port Saint Sauveur in the west – a small port, with toilet facilities. So my walk around the Ile grande started there at low tide in the summer.

Port Saint Sauveur

I decided, arbitrarily, to walk anti clockwise around the ile. And this takes you past the marshland and the road that accesses the ile Grande. For almost the entire walk the path is clearly marked and easy to follow. It does get a little narrower on the north side.

As you walk around to the east there are dunes which are protected and being restored. But there also beaches and water sports should you wish to make a day of it.

East coast

There are plenty of flowers and plants to photograph too, although looking back over my images from my Walk around the Ile Grande I was clearly drawn to the sea and the majority of my photos were of the sea and coastline. Just for good measure here is a cauliflower lookalike, a Bishop’s flower I believe.

Northern coast

On the northern coast there are several historical references to the old granite quarries of the past. This includes old rail lines, statues and a short explanation. There are small hidden beaches and impressive rock formations. Also it is worth noting that the white stones are there to protect the coastline from erosion.

As I headed back southwards to my starting point I passed the bird protection centre. they use an old quarry as a very large bird cage for birds who have almost recovered. Check if you can visit it.

Back to the start

And back to port Saint Sauveur, some 7.5km and between 2h30 and 3 hours, depending on how many photos you take.

If you are interested in visiting the region there is a website, in English, run by the tourist dept here. There is also an app on google play or apple.

I am a big fan of the area. My sunset was taken nearby. As was the mist in the landscape gallery.

How to purchase

Other photos of mine are available for purchase on my Adobe Stock store, in the menu above or  via the store directly below.


Please, take a look and tell your friends about my work and sites.

Other pages that may interest you

There is a post about my walk along the sentier des douaniers near Toulon.

Photo Merging to make a panorama

Estimated Reading Time: 2 minutes

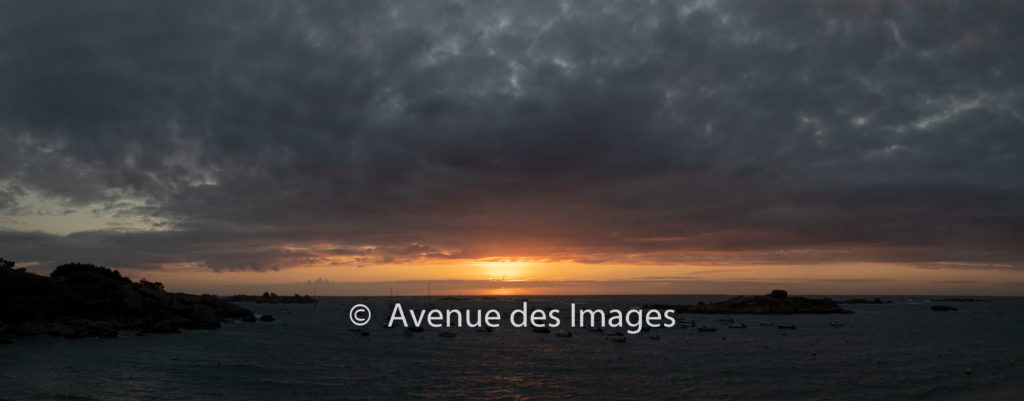
Armed with my camera and tripod and a westerly facing beach I decided to capture a sunset. A fairly quiet sea, some interesting clouds and some small boats in the bay made for an interesting composition. The idea was to use photo stitching to make a panorama. Photo merging, a nice feature of apps, takes overlapping photographs and builds a single image from all those selected. Photo Merging to make a panorama stitches together overlapping photos.

Camera setup

I set the camera up with a wide, 18mm focal length, an ISO of 100 to reduce any noise from the pictures. Noise doesn’t really show up on the small screen of the camera but will be visible back at home on the PC screen. It shows up as a sprinkling of tiny dots of varied colours. As its a sunset it is naturally dark, so set a longish exposure. I took these at 1/30s. Longer exposures would potentially lead to issues with the boats moving or waves. Shorter exposures could prove incompatible with an ISO of 100.

The steps

To stitch together photos, the software needs a good overlap for each photo. Let’s say 2/3s as a minimum. They also need to be moving across the same horizontal line. To do this you need to have reference points. For a sunset the horizon and the sun are obvious candidates. Remembering not to look at the bright sun which will damage your eyes and camera. On the screen of the camera make sure the grid is switched on on the screen. If there is a level on the screen the tripod or the camera use this to help ensure the sequence of photos are on the same level.

The photos

So here are the series of photos I took. You can see the sun creeps gradually across the image from right to left.

Post session editing

I used Adobe Lightroom to stitch them together and verify the horizontal. Under the Photo menu is the command “Photo Merge”. It offers 3 options: HDR, Panorama, and HDR Panorama. HDR is for creating High Dynamic Range images, which have more exposures combined together into one image. It has become popular on recent TVs. But that is not what we need. we need the 2nd option : Panorama. Select the photographs, with control or shift, pressed if needed and use the Photo Merging to make a panorama.

The very observant of you will notice that I also used the Photoshop healing brush to remove the streetlamp towards the right side which I felt added nothing to the composition. Especially as they are no longer operational anyway in an attempt to reduce light pollution.

This technique can be used rather than grabbing your smartphone and spinning around. It will give you bigger and better images. It can also be used vertically.

You can see other examples on my landscape page.

These photographs were taken at the end of the golden hour. What is that? Read more.

Some of my photos are available for purchase on my Adobe Stock store or via the link in the menu or directly below.