Category: Tips

Get started with long exposure 

Estimated Reading Time: 4 minutes

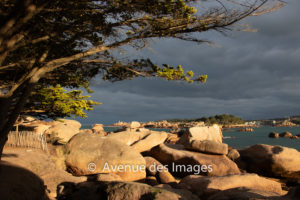
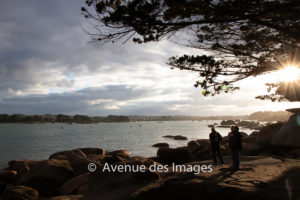
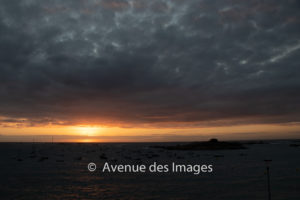
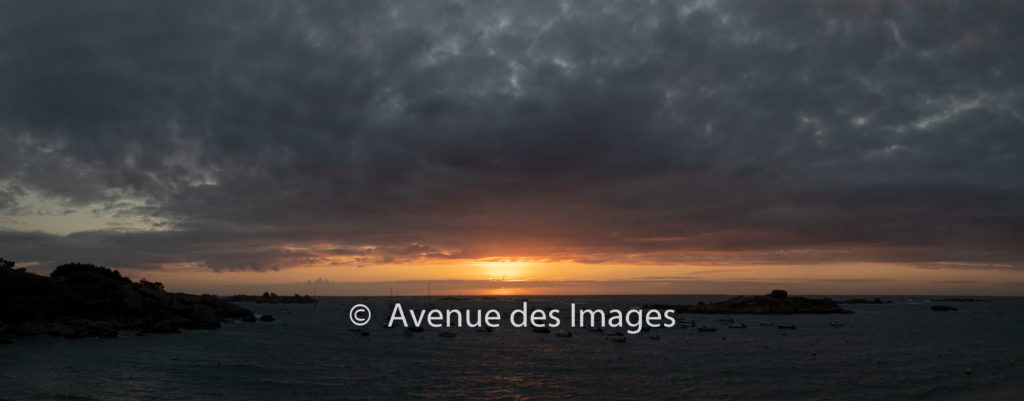
Long exposure photos can be some of the most remarkable images. But how do you get started with long exposure photography? Let me tell about a recent trip I did to Brittany, France, and give you some simple tips to get started.

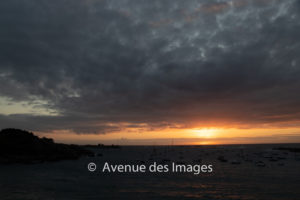
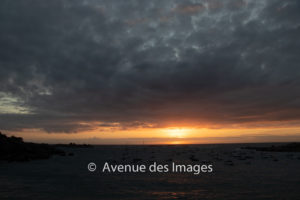
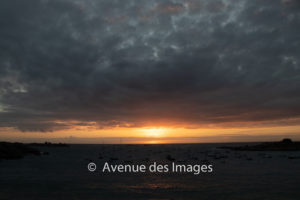
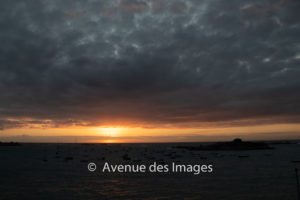
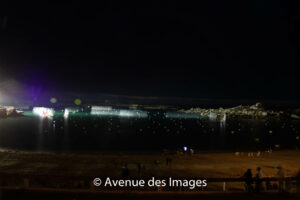
I was lucky to be able to visit Tregastel, France during the 49th 24 hour sailing regatta (see the town’s French website – opens in a new tab).  This event hadn’t been held since 2019 due to the COVID pandemic. 

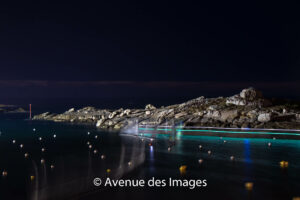
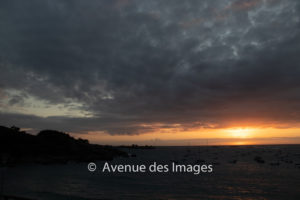
As the event takes place over 24 hours there was an ideal opportunity to experiment taking pictures of sailing yachts at night.  Additionally, there was a firework display scheduled that evening. A real treat.   Also a chance to try some other techniques.

What Is Long Exposure Photography? 

Exposure defines the duration that the camera’s sensor is exposed to light.  Originally it was the film, now it is the image sensor.  A short exposure lets in a little light, useful when in bright sunlight, and has the advantage of freezing movement as the subject is only seen for a fraction of a second by the sensor.  Long exposure photography does the opposite and uses a slow shutter speed keeping the sensor exposed to light for a longer period.  A long exposure will be defined when we keep the shutter open for a second or longer.  

Cameras will calculate the exposure time for you in automatic mode and you will see the time increase as light fades.  Many camaeras have a maximum of 30 seconds. In manual, or semi-automatic, mode you can set the time yourself.  Finally you can use Bulb mode, where you control the shutter, and it remains open as long as you are pressing the shutter release button.  

What does a long exposure create? 

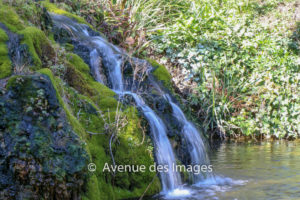
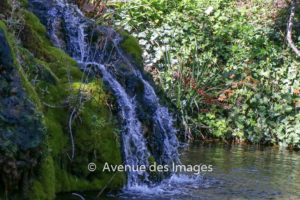
As mentioned above long exposures will capture motion as the camera’s sensor is exposed to light for a longer period and  therefore a moving object will be seen by several parts of the sensor.  A common subject of long exposure landscape photos are rivers and waterfalls. As each drop of water travels across the sensor the water blurs and creates lines of blurred water, almost like clouds.  (You can see a long exposure waterfall image on the waterfall blog post) Images of waves at sea do the same thing.  Blurring will occur in any part of the scene where there’s motion.  This softens the image. 

In my case, even if I was by the sea, my target was to capture something moving in the dark.  In this case the long exposure lets what little light there is to be captured by the sensor.  This is how you can capture stars.  Of course, anything that is moving will  create the same soft blurred lines that a drop of falling water does. Whether it a boat or a star. So how do you get started with long exposure?

Tips for long exposure photography 

Taking photographs with a long exposure time is perfect for capturing motion blur and light trails. But there are some simple rules that must be followed.  Above I talked about moving subjects, but unfortunately the same is true if the camera moves.  If you shake the camera the tiniest amount when you press the shutter release button everything in the image will have that blurred movement effect and that is rarely the desired effect. 

Long exposure rules: 

  1. Use a tripod. Helps avoid camera shake. 
  1. Use a remote release button. This could be a wire, and remote control or a phone app. 
  1. Try various camera setting. There are broad rules, but you really need to set the camera up for your specific environment.  

Typical long exposure settings 

  1. The 500 rule. For star photography the 500 rule estimates the maximum exposure time you can shoot before stars become blurry or star trails appear. You divide 500 by the focal length of your lens. To capture the sky you would use a wide angle lens, for example,  a 18mm lens, then the rule says 500 / 18 = 27.78 seconds. This is just under the 30 second maximum that most cameras allow for a long exposure before going to bulb mode. 
  2. For fireworks. Fireworks are generally very bright so easy to see, but moving quickly and appear unpredictably. So start with ISO 200, F/11 and bulb. Press the shutter  release button when you hear the firework launch and keep it open until the firework fades. Check and see if you need to modify anything or everything.
  3. Use manual focus. It’s not easy for a camera to automatically focus on a firework which hasn’t even been lit yet. So set the focus to manual. We know the firework will be in the sky so set focus to infinity. In reality it’s not easy for us to do this either. Pointing the camera into the night sky and trying to focus when you can see nothing. A technique that can help is to set the camera to video mode and focus on some visible object, then switch to manual focus and finally back to camera mode. 

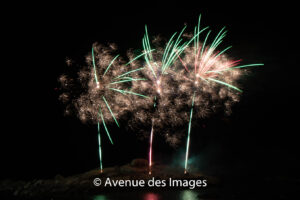
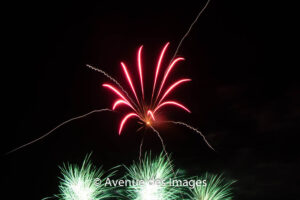
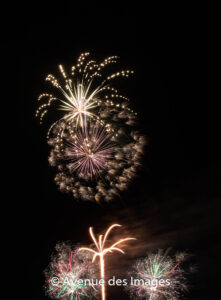
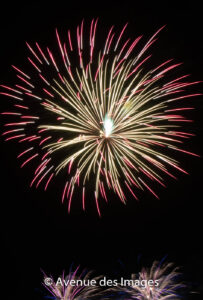
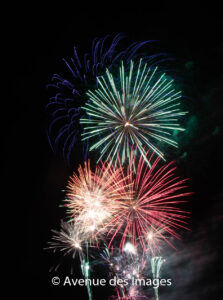
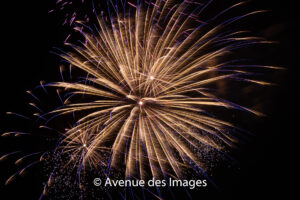
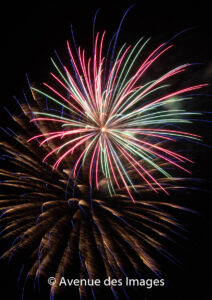
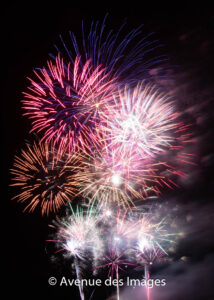
In my photographs you can see various fireworks which, ultimately, I took with F/7 to let a little more light in.  These simple tips should help you get started with long exposure photos.

If you are interested in other long exposure images take a look a the low light blog post.

Purchase my images.

You can purchase my images via the menu above or directly below:


Share my blog

You found this article interesting? I am thinking yes if you got this far. Please share with your friends

The role of white balance

Estimated Reading Time: 3 minutes

This March has seen a wide range of weather, more than usual I think. Early Spring warmth and late winter coolness. Spring weather photography can inspire and to benefit we must always have a camera handy. There was even a good coating of sand from the Sahara giving exceptional sunsets. In March the sun is still relatively low in the sky which helps with the lighting. So why am I talking about the role of white balance? Because as I mentioned, the early spring warmth and winter coolness, and white balance is all about the warmth and coolness of light. Here are three examples where different lighting can make a big impact on the results.

Let me draw your attention to a camera feature that you may rarely look at: White Balance.

What is White Balance?

It can simply be put as the colour of the light, and this is defined by its temperature. If we use the noon sunlight to be the standard some light appears more orange, for example candles, and some appears bluer, for example modern car headlights. These are also referred to as being warmer, being orange, or cooler when bluer like a cold tap.

White balance values

Your camera, and phone are, by default, set up to take pictures using an automatic setting for white balance, AWB. You will find it in the menu, or expert menu. The role of white balance is to adjust the camera to compromise lighting conditions to take a good image in most circumstances.

The setting of white balance is creeping into everyday life too. This should make understanding it much easier. When you purchase LED lights they are defined by their temperature. Temperature is defined by 3 scales: Celsius (C), Fahrenheit (F) and Kelvin (K). Ice is defined as 0°C, 32°F and 273.15K. LED lights and White balance use the Kelvin temperature scale. For your cameras, a little counterintuitively, warmer candle like orange light has a lower temperature than the bluer clear sky. Typically the light from a candle will be 2000K and a cloudy sky 6500K.

How to set white balance

Why modify the AWB setting? Simply we want a white sheet of paper to look white when we photograph it. If we take the photo of the white paper in a candle lit room the paper will appear orange. The role of white balance is to tell the camera that this orange colour, the 2000K, is in fact white, which is about 5500K. The camera then has a simple addition/subtraction of some Kelvin to do to make our whites really white.

In the menu of the camera you may not find the Kelvin scale, but terms which relate to the typical light source for that temperature. So 2000K will be referred to by incandescent. 6500K as cloudy.

Using RAW is better

If you can take your photos in RAW, rather than JPEG, you have the added advantage that in post processing you can modify the white balance easily. This can be very useful, for example, when you are taking a series of photos of the same subject. A wedding is a classic example where the bride is dressed in white and you are photographing her in the garden, in sunshine and shadows, inside dark a building, around a candle lit table, in camera flash. All very different lights and therefore temperatures. If you don’t modify the white balance the dress will change in colour during your day.

Learn more

There are many resources on the internet which can explain all this in more detail and go further to explain how to set the white balance manually using the white object that you want to appear white in specific lighting conditions.

Take a look here, photographylife.com (opens in a new tab) for example.

Other photos

I have some other different lighting photos on my site, for example: Evening sunlight and lighting and shadows.

Some of my photos are available for purchase on my Adobe Stock store or the link in my fine art store (opens in a new tab).

Late evening sunlight

Estimated Reading Time: 2 minutes

The late fall/autumn evenings announce the arrival of a sun that is lower in the sky and gives a warmer glow to your images. Late evening sunlight is often enhanced by a sprinkling of cloud in a crisp blue sky. I particularly like it for creating silhouettes, sunbursts and warm panoramic scenes.

The sunlight early in the morning is also a desirable commodity and gives wonderful lighting to your photographs. Late evening sunlight, like early morning sunlight, takes a different, longer journey through the atmosphere before reaching the subject of your photograph. The blue light tends to get dispersed on this longer journey leaving more red and oranges.

The Golden and Blue hours

As the quantity of blue light is reduced the Late evening sunlight has a more golden colour, and this gives rise to the popular term of the Golden Hour. The golden hour occurs shortly after the sun has risen and before the sun sets. As the sun sets and sinks below the horizon all those red and orange lights are fired over our heads and the light turns bluer as we head towards night. Likewise in eth morning, before the sun rises the light has a blue tinge to it. It isn’t difficult to understand why these periods are known as the blue hours. It’s worth noting that neither the blue, nor golden hours actually last rigorously an hour. Their duration depends on the time of year and where you find yourself on the planet.

Position of the sun

The lighting around dawn and dusk are determined by the position of the sun. During the golden hour the sun’s position is low. The late evening sunlight of the golden hour gives you :

  • more reds and oranges
  • longer shadows
  • lower intensity light
  • side or straight on lighting

The midday sun would be the opposite lighting. The sun gives

  • bright whites and dark blacks
  • short shadows
  • bright bleached washed out colours
  • top down lighting

So the golden hour is the prefer time for many photographers.

Morning and Evening

There are two golden hours each day. In summer, the closer you live to the poles, the earlier or later you have to be out taking photographs. That can be a considerable advantage of the winter golden hours for the late risers. Taking advantage of the both golden hours is not always required. Choose the best one for your subject. The sun won’t be totally opposite in the morning and evening golden hours but if the sun is the wrong side of your subject in the morning, there is a good chance in the late evening sunlight you will have the shot you are looking for.

As the day turns to night the photographs are transformed with the changing light. The last few minutes of the late evening sunlight give beautiful sunsets.

Some of these photos are available for purchase on my Adobe Stock store. Or from the menu above, or even buy your art directly below.


Other posts that may interest you

End of the day – the Eiffel tower

Low light needs a tripod and patience

Photo Merging to make a panorama

Estimated Reading Time: 2 minutes

Armed with my camera and tripod and a westerly facing beach I decided to capture a sunset. A fairly quiet sea, some interesting clouds and some small boats in the bay made for an interesting composition. The idea was to use photo stitching to make a panorama. Photo merging, a nice feature of apps, takes overlapping photographs and builds a single image from all those selected. Photo Merging to make a panorama stitches together overlapping photos.

Camera setup

I set the camera up with a wide, 18mm focal length, an ISO of 100 to reduce any noise from the pictures. Noise doesn’t really show up on the small screen of the camera but will be visible back at home on the PC screen. It shows up as a sprinkling of tiny dots of varied colours. As its a sunset it is naturally dark, so set a longish exposure. I took these at 1/30s. Longer exposures would potentially lead to issues with the boats moving or waves. Shorter exposures could prove incompatible with an ISO of 100.

The steps

To stitch together photos, the software needs a good overlap for each photo. Let’s say 2/3s as a minimum. They also need to be moving across the same horizontal line. To do this you need to have reference points. For a sunset the horizon and the sun are obvious candidates. Remembering not to look at the bright sun which will damage your eyes and camera. On the screen of the camera make sure the grid is switched on on the screen. If there is a level on the screen the tripod or the camera use this to help ensure the sequence of photos are on the same level.

The photos

So here are the series of photos I took. You can see the sun creeps gradually across the image from right to left.

Post session editing

I used Adobe Lightroom to stitch them together and verify the horizontal. Under the Photo menu is the command “Photo Merge”. It offers 3 options: HDR, Panorama, and HDR Panorama. HDR is for creating High Dynamic Range images, which have more exposures combined together into one image. It has become popular on recent TVs. But that is not what we need. we need the 2nd option : Panorama. Select the photographs, with control or shift, pressed if needed and use the Photo Merging to make a panorama.

The very observant of you will notice that I also used the Photoshop healing brush to remove the streetlamp towards the right side which I felt added nothing to the composition. Especially as they are no longer operational anyway in an attempt to reduce light pollution.

This technique can be used rather than grabbing your smartphone and spinning around. It will give you bigger and better images. It can also be used vertically.

You can see other examples on my landscape page.

These photographs were taken at the end of the golden hour. What is that? Read more.

Some of my photos are available for purchase on my Adobe Stock store or via the link in the menu or directly below.


Using a zoom lens

Estimated Reading Time: 2 minutes

A Summer morning gave me another chance to grab my versatile 18-135 mm f/3,5-5,6 zoom lens and Canon DSLR show you the possibilities when using a zoom lens. The weather was bright sunshine which presents some issues but makes a walk in the garden very enjoyable. The flowers, leaves, insects, the reflections on the pond were the ideal environment to get great photos and a source of inspiration. In this post I just want to show you the impact of using a zoom lens on the composition of the image.

The context

The above panorama shows the context. There is a path that goes all the way around the pond, with bridges at both ends. The view is particularly captivating from the bridges. But it is also beautiful from all sides. This means that people are often in the frame and can be a distraction from the natural beauty. Using a zoom lens, and patience, will allow you to capture the images when there are few or no people in the frame.

Above you can see people on the bridge and on the right hand side. The person in red, under the weeping willow tree, is the most bothersome as red really catches your attention.

First, whenever possible, set the ISO on your camera to 100, as I did here. This will reduce any potential for noise in the final image. Noise being a grainy aspect to the photograph.

Three examples

Here are 3 photographs from the bridge at the eastern bridge. They were taken with focal lengths set to 22mm, 56mm and 76mm.

If we compare these to the panorama we can see that the higher the focal length is the less we can appreciate the length of the pond. Distances are compressed. This is where the artist in you will decide the right balance between keeping the depth of field in the image, zooming to remove distractions, and focusing on details.

Clearly if the bridge is the subject of the photo the more you zoom the more of the bridge you will see. It is hardly visible at 22mm. But if you are taking a photo of a water lily pond, then 22mm really shows the pond in its surroundings.

My favourite here is the 56mm. Why, because it takes the gentlemen on the right out of the frame, it keeps the blue sky, the impression of a pond. The reflection on the waters surface of the sky is less overpowering.

Zooming even more

Changing the objective on my camera to allow me to zoom to 250mm allows me to focus on individual items in and around the pond. Here is a of 2 while lilies amongst their leaves. There are several insects in and around the flowers. If you look carefully there is a turquoise dragon fly just a short distance above the left lily.

I did another post on zooming earlier in the year which you can find here.

You can see more flowers from this garden in my flowers gallery, https://avenuedesimages.com/flowers-and-plants/

Some of my photos are available for purchase on my Adobe Stock store or directly below. There are other landscape photos here.


Capturing birds in flight

Estimated Reading Time: 4 minutes

My afternoon introduction to capturing birds in flight tool place at the Étang de la Galiotte. This translates to Galiotte Pond. When you visit you will see that is an understated way of describing a large mass of water in Carrières-sous-Poissy. Capturing birds in flight professionally requires specialized equipment. I need to verify that I am interested enough to make that investment. So with my existing equipment I see about capturing birds in flight.

You can see from the map the lake is quite large. The town of Carrières-sous-Poissy, which translates to Quarries under Poissy, gives a good clue to the origin of the Étang de la Galiotte. The Paris region is made up of layers of sand, limestone, mixed with various amounts of clay. Being by the river Seine transport of the quarried sand was easy. Subsequently the Étang de la Galiotte was filled with river water to make a lake.

The lake is a major feature of the new park du peuple de l’herbe which covers 113 hectares.

Today, the lake and surrounding park are the host of birds, fish and people. There is a small island in the centre to help birds nest and breed. Making it a good site for capturing birds in flight. This protected natural space hosts a village of about 30 floating homes on the southern shore of the lake. There is an active residents association.

The Yvelines region published a detailed study, in French, about steps taken to avoid the risks associated to natural disasters in the region linked to the river, the geology and other potential threats.

Now to my visit. What did I see and how did the afternoon go?

Getting There

First of all if you arrive from Paris take to the train or RER to Poissy. You can walk from the train station at Poissy. It’s a fairly level walk over the main road bridge. It will take 20 minutes, about 1.5km. If you arrive by car, then I suggest you park in the Parking du parc du peuple de l’herbe. There are several bus services which use the road bridge to get to the Poissy station. The town of Poissy has also a project to build a new footbridge (site in French) linking the station to the park.

For the less nimble on their feet, I would recommend sticking to the path that run along the river Seine, rather than those by the lake which end up as a narrow track in the woods.

Bright sunshine and water

Bright sunshine can make photography complicated. On the good side everything is brightly lit, but with that comes shadows. And the contrast can be hard to manage. Add to that water, and to a slightly lesser degree the bright blue sky, and you have bright reflections and dispersed light from the sky and water. This can make the blue sky appear grey, the beautiful water dull and opaque.

Polarization

The solution to this is a polarizing filter. You may will be familiar with polarizing sun glasses. The same filter on your objective will filter out light which is dispersed in all directions. It will leave nicely aligned light rays. The advantage that the filter has over sunglasses is that you can spin the filter to choose exactly which direction the light rays should be. This allows you to choose the blue colour for your sky and optimize the view of the water so you can see the fish etc. Unfortunately my filter was not with me on this trip.

Freezing motion

So I chose to focus on the bird-life. In June the young ducks and geese still look cute and fluffy. They become a natural subject for cute photos. There are also plenty of terns here. They fly quickly over the water’s surface before diving into the water to capture fish. And the fish don’t have much chance as they are so fast. This speed also makes them difficult to photograph.

Some starting steps

Time needed: 30 minutes

Capturing flying birds

  1. Before you go

    Empty the memory card, and take the fastest card you have. It might be worth checking what file types you are storing. In general I write RAW and JPEG files to the card. Doing this means writing takes longer and uses more space. You could just save high quality JPEG for this session.

  2. Select objective

    Use a zoom, I would say at least 135mm, preferably 210mm, or more

  3. Use auto-focus

    Set the auto focus to AI servo. You will not be able to focus manually on the fast moving birds, use the camera’s intelligence o track them in flight

  4. Choose the ISO setting

    Consider setting the ISO to 100, or 200, depending on the aperture of your objective. The smaller the aperture the less light will be collected and therefore a higher ISO can help.

  5. Set speed

    In order to freeze the movement of a bird, or anything moving rapidly, set the speed to a maximum of 1/800s

  6. Review and modify

    After your first series of photos review and adjust the settings. Too dark check the ISO and aperture. Blurred reduce the speed.

  7. Repeat

    There will be many missed shots so just keep going

SD Card speeds

There are many sizes of SD cards, but I would suggest 32GB or 64GB. Which gives plenty of room and not a totally unmanageable volumes of photos to sort through when you get home. When the technology was launched it supported a 12.5 MB/s speed. At this speed it would take 2 seconds to write a typical RAW image. Making continuous shooting for a bird in flight impossible. The technology now supports up to 3940MB/s however not all cameras support such speeds, nor do they need them. There are 3 common ways of describing the speed that the card can transfer data.

Look for card with the U3 class. These can support up to 30 MB/s which id ample for video and photo recording. There is more information on the classes on the SD card Association website.

Good luck capturing birds in flight. If you further inspiration try this external website.

Return visit

It’s a great park and I went back in the winter. You can read about it here.

I have other posts about my visits along the River Seine, for example Spring walk along the Seine

Purchase my art

Some of my photos are available for purchase on my Adobe Stock store the link in the menu.

Or by clicking on the widget below.

Low light needs a tripod and patience

Estimated Reading Time: 3 minutes

Low light can bring a great atmosphere to any photo. However, low light needs a tripod and patience if you are to capture the subjects at their best. A tripod because you are going to be taking long exposure photographs and without it there will be movement. The slightest movement will lead to blur. Patience because those long exposures may mean people and pets keep popping into frame at the wrong moment spoiling the perfect shot.

Low light occasions easily present themselves at dusk and dawn and indoors. I am going to a local church to capture some of the atmosphere.

What equipment?

As I said, low light needs a tripod and patience. I have a small Rollei tripod. Some will say I am a bit short of patience but we’ll make do. Traveling light means I will take my Canon and 50mm objective. Why not a zoom you may ask? Really, I choose my 50mm because it has has a large f/1.8 aperture so it can let what little light there is into the camera body. It’s also a great objective for capturing a variety of subjects.

Making sure there was nothing else was happening in the church, and that we had permission, I was allocated 2 hours with the objective of 10 or so images.

The process

Initially take a slow walk around the building looking at everything. Focus on the lighting and shadows. You might not be able to get high up, check out where any choir or organ is situated. But certainly low down angles can give interesting images. If you have seen some of my photos of trees you will know I like looking up, for example. Contrasting shades and colours are good subjects. This can come from lights, or even better the sun. I was fortunate to have sun shining through stained glass windows which brings colour to objects which wouldn’t normally be coloured. Candles are also a source of light but the flames do move so can be tricky on long exposures or when creating an HDR, or bracketed, image.

After reviewing the site, set the ISO to 100. Why? we don’t want the camera software doing clever compensation for the lack of light and increasing the sensor sensitivity leading to noisy pictures. Although I have heard that you can reduce the noise, by merging several images. Not something I have tested yet but when I do I’ll add a link here. Because we have our tripod we can extending the exposure time to avoid any issues . Finally, set the settings to manual or AV, Aperture priority, f/1.8 and off we go.

The results

I wanted to share the images capturing the architecture, the candles and the sunlight. They show that low light needs a tripod and patience. Whether it be waiting for the visitors to move away from the seating, the walkways or the pillars. or coming back to the same chair later in the visit as the sun made its way round to add colour to plan straw chairs.

Finally, if you are out and have no equipment or just out of patience, today’s cameras can do a good job. For example the final candle above. The downside is that it’s a little noisy.

Other posts that you may like

If you are interested in lighting, I have some other photos on the lighting page.

There is also a blog post on :

Some of my photos are available for purchase on my Adobe Stock store, via the link in the menu or directly below.


Walk along the Seine from the river Oise

Estimated Reading Time: 2 minutes

Last week I walked along the river Seine towards Paris, starting in Conflans-Sainte-Honorine. Walking the in the other direction, towards the sea, Conflans is home to the confluence of the rivers Seine and Oise. So today I decided to walk along the Seine from the river Oise. There are few parking spaces at the confluence of the two rivers.

Both rivers have a path so you have to choose, today I decided to take a short walk along the Seine. The river Seine is a major transportation route and large barges are almost always moored in Conflans. Important road and rail links are also a feature of the town. Alongside the river, the landscape and nature I wanted to capture the transportation links.

The cycle bridge is part of the itinerary from Paris to London. The segment from Maisons-Laffitte to Chaussy, some 48.71km. The rail bridge is part of the RER A line running from Cergy le Haut to Paris and in Conflans fin d’Oise the station also serves the railway line from Paris St Lazare to Mantes la Jolie. From the footbridge you have a lovely view towards the historic town centre of Conflans Sinte-Honorine. You can also witness local birds looking for a meal.

HDR photos to bring out hidden features

I wanted to compare a colour photo of the underside of the rail bridge with a black and white version. Industrial sites lend themselves well to black and white images. I also wanted to capture the clouds and the metal structure. This called for a high dynamic range. Something that many cameras offer today. It builds a single image out of several, often 3, images of the same object. Each image is taken with different exposure settings to capture different lighting and details.

I also took a walk this spring around Villennes sur Seine, which is just a short distance away, on the way to the sea!

Going the other way towards Paris, I have a post about Urban Photography at La Défense.

Some of my photos are available for purchase on my Adobe Stock store, via the link in the menu or directly below.


The effect of shutter speeds

Estimated Reading Time: 2 minutes

The effect of shutter speeds on the final picture is very important. The shutter speed , or exposure time, determines how long light falls on to the image sensor or film. It is measured in fractions of seconds for most photographs. The image sensor, or film, is very sensitive to light. Typically you see the time expressed as 1/125 sec. 1 slot of 125 equal slots of one second. As you extend the duration, the number will get smaller, A duration of 5 slots of 125 could be expressed as 5/125s, but you would see it as 1/25s. As with many features of a camera shutter speed is impacted by other settings. Most importantly the ISO. ISO is a definition of the sensitivity of the film or sensor. The higher the number the more sensitive the sensor is.

The brightness of a picture still depend on the light captured and this depends on 2 factors the speed and ISO. They are balanced like a seesaw. If you increase one you can reduce the other.

Of course the aperture, the size of the hole letting light in also has an impact.

These 2 photographs show the same waterfall at 1/10 second and 1/1000 sec. showing the blurred movement of the water or droplets frozen in time.

Let’s get back to the effect of shutter speeds. They are most useful when considering movement. This movement can come from the subject being photographed. In my examples above – the water. But is also can come from you as you move ever so slightly when pressing the button or wobble on a precarious cliff edge, (please don’t!).

The movement gives the image blur as the light from specific point of water, bird, car etc moves and is captured in more than one position. So the slower the shutter speed the more blur. If we want to capture something moving we can have 2 objectives to either:

  1. Capture the subject of the photo as if it was still, so that the light from the subject always falls on the same part of the sensor. This can be done by moving the camera in parallel with the object, Which is not easy. Or it can be done by having a short shutter speed so the light enters the camera before the object has had a chance to move. However the background will appear blurred as we are moving.
  2. Capture the subject to show the movement, by intentionally allowing some blur. To do this we have a longer exposure time, slower shutter speed. So the light moves across the sensor creating blur in the subject; often against a background that hasn’t moved.

Some of my photos are available for purchase on my Adobe Stock store or directly below.


Other landscape photographs can be found here. You can see more waterfalls here and a post about long exposure tips.

The versatility of a zoom lens

Estimated Reading Time: 2 minutes

A Spring afternoon in a park gave me the opportunity to grab my versatile 18-135 mm f/3,5-5,6 zoom lens and Canon DSLR and put it to the test. Just how flexible and versatile is a zoom lens? The weather was overcast and just a little too cold to be comfortable. There were some signs of Spring, but not many. I decided to focus on the trees. As there are no leaves the branches, the trunk and the reflections on the pond had to be the source of inspiration. Light, or lack of it, would be the challenge.

To get an idea of the park these fist few photographs are taken with a wide focal length, around 30mm, to capture the landscape.

There is no bright sunlight to provide vivid colours.

But with a longer exposure and a solid base a longer exposure time can provide a compromise. Take advantage of anything nearby. For example a post, bench, fence or in my case a tree.

Using the tree, as a support, and looking up towards the sky can give an unusual aspect and 0.8sec at ISO400 lets in more light.

Zooming in low light

Testing the zoom in low light conditions isn’t easy. As you zoom to the distant subject the light reduces so you must increase the exposure time. These 2 shots show a tree trunk that vaguely resembles a dinosaur foot. The first taken with 24mm at 1/125sec, the second 135mm at 1/25 sec. At 1/25sec the risk of camera movement spoiling the photo is significant. They do show the versatility of a zoom lens and with a tripod the slight shake would disappear.

Beaten by the dull light I decided to go with the flow. What can be move atmospheric and haunting that trees at dusk.? Let’s start embracing low light. Even making it more pronounced. Here are a series of darker and darker shots.

Unexpected bonus

The last unexpected shots came whilst taking the scenes above when a dove flew past a couple of times. Leading me into trying to capture movement in low light with a zoom lens. I quickly set the speed to 1/800s, even faster if you can, but I didn’t have time to be fussy. However I did ensure I was using servo auto focus. These were then taken at 56mm and 135mm. Not too bad considering. Demonstrating the versatility of my zoom lens. I did a quick edit to make them black and white as there was so little colour anyway.

You can find out more about the parc Meissonier, in Poissy, France at the departmental website, in French, or the town’s website also in French.

I did another post on zooming later in the year which you can find here.

Some of my photos are available for purchase on my Adobe Stock store directly below. There are other landscape photos here.